
Resin art is more than just a creative hobby—it’s a captivating and immersive process that draws in enthusiasts from all walks of life. Whether you’re a seasoned artist or someone looking for a new form of self-expression, resin art has a way of hooking you in and making you want to come back for more. But what is it about resin art that makes it so addictive? And how do you get started on your own resin art journey? In this article, we’ll explore the allure of resin art, its addictive nature, and provide a guide to help you begin your creative adventure.
The Allure of Resin Art: Why It’s So Addictive
1. Endless Creative Possibilities
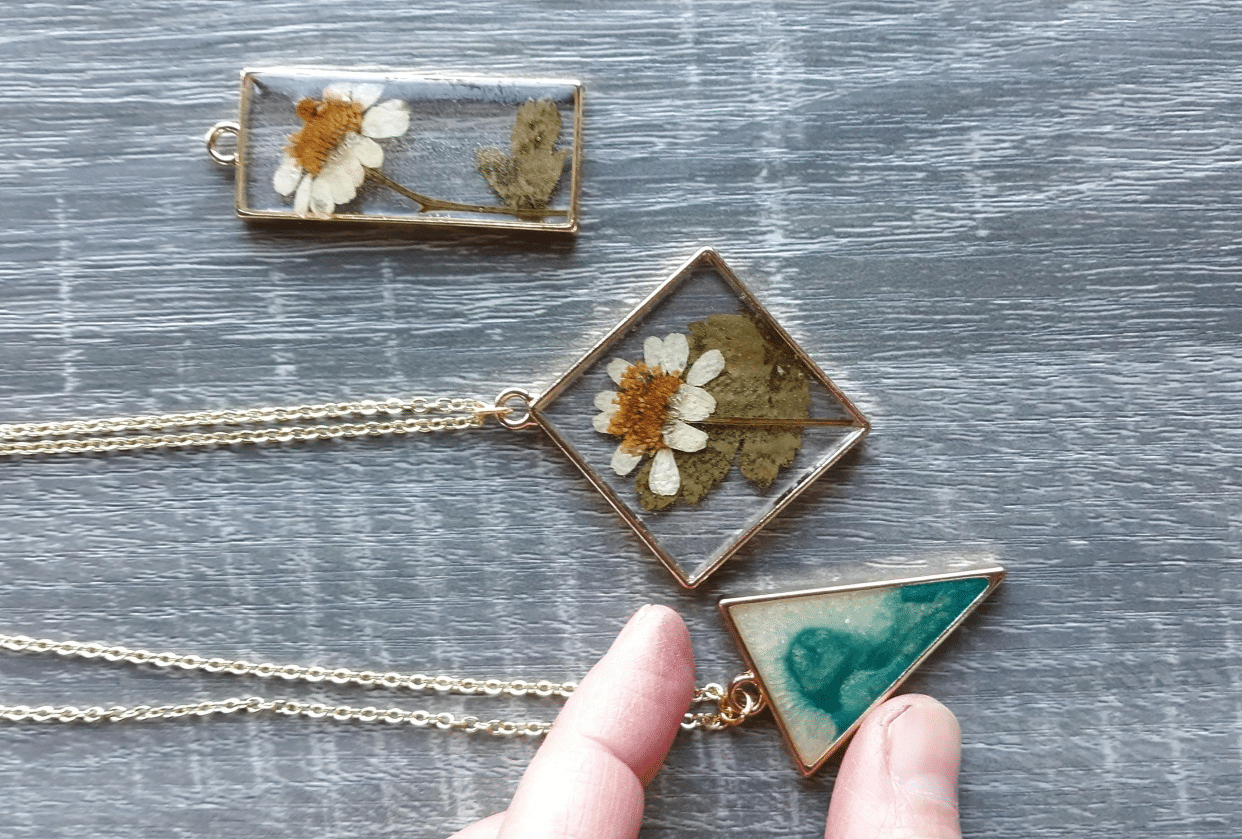
Resin art offers an almost unlimited range of creative possibilities. From fluid abstract pieces to intricate designs, the medium allows artists to create everything from jewelry to large wall pieces and even furniture. Resin’s versatility is one of the main reasons it becomes so addictive. The fluid nature of resin allows for various techniques, including pouring, embedding, and layering. You can incorporate a wide range of materials like pigments, glitter, beads, and even natural elements like flowers or seashells.
What makes resin especially alluring is the surprise factor. The way the resin flows, shifts, and settles into place can create unexpected patterns and textures that spark excitement and curiosity. Every project is a little different, and there’s always the potential for discovering something new.
2. Instant Gratification with Stunning Results
Unlike other art forms that require hours or even days to complete, resin art often provides faster gratification. Once you’ve poured the resin, the process moves quickly, and you can often see the results within a few hours to a day. The hardening process might take longer, but you’ll immediately see the effects of your work take shape.
This speed of results can be incredibly addictive. The quick turnaround encourages experimentation. If something doesn’t turn out the way you envisioned, you can always try again, adjusting your technique, colors, or materials.
3. The Therapeutic Process
Resin art is known to be therapeutic and calming. The process of mixing the resin and hardener, watching it flow, and manipulating it to create desired effects can feel meditative. For many, it provides an escape from daily stresses, offering a focused, hands-on activity that helps clear the mind. There’s something satisfying about the tactile nature of resin—it’s a bit like a dance between the artist and the material, with the artist shaping the flow of the resin, while the resin itself provides a sense of freedom and unpredictability.
The sense of accomplishment when you see your piece fully cured and glossy is incredibly satisfying. The tactile feedback and visual payoff reinforce the desire to keep creating. That feeling of completion, of taking a raw material and turning it into something beautiful, is a major part of the appeal.
4. Learning Curve That Never Ends
Resin art is deceptively simple to start, but as you gain more experience, you realize there’s an infinite number of techniques to master. From mixing your resin perfectly to mastering the art of color blending and layering, resin art offers a continuous learning journey. Every mistake, every experiment, brings new lessons. Artists get hooked on the challenge and the sense of progression that comes with each new project.
Even as you become more proficient, there’s always something new to explore—whether it’s trying out new pigments, experimenting with temperature for different effects, or even combining resin with other media like wood, metal, or glass. The possibilities for improvement and innovation are endless, and this ongoing challenge keeps artists coming back for more.
5. The Wow Factor
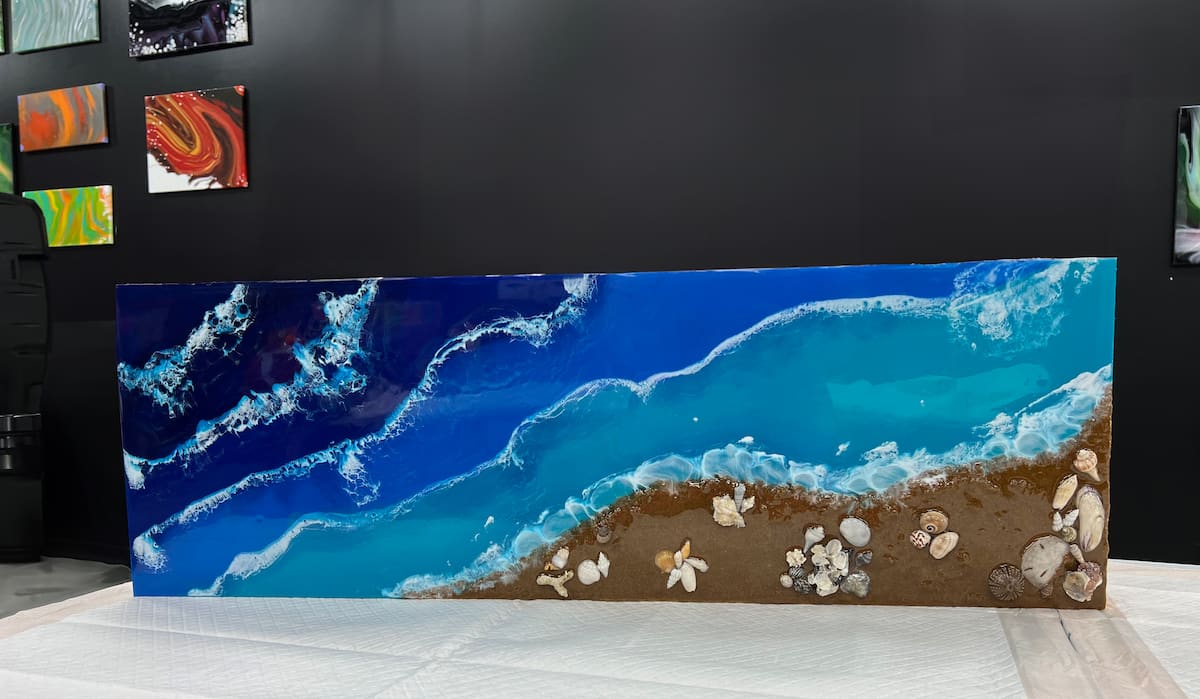
Few art forms deliver the “wow” factor as quickly and dramatically as resin art. The high-gloss, glass-like finish of resin is often a jaw-dropping feature of a finished piece. The vibrant, translucent colors, intricate swirls, and depth created by layering give resin art a unique aesthetic that instantly catches the eye.
For artists, this is a huge draw. You can create pieces that are visually stunning and, in some cases, look like they were made by professional designers. Resin art can be the centerpiece of any room, whether it’s a tabletop, wall art, or a pendant. The allure of creating something that not only looks incredible but also has that ‘wow’ factor is irresistible.
Getting Started with Resin Art: A Step-by-Step Guide
If resin art has sparked your curiosity, you might be wondering how to get started. Here’s a concise and easy-to-follow guide to help you begin your resin art journey.
1. Gather the Essential Supplies
Before you dive into creating resin art, it’s crucial to have the right supplies. While resin art doesn’t require a massive investment in tools, having the basics will ensure your success.
- Epoxy Resin and Hardener: The most important component. Ensure you get high-quality resin, as the finish and longevity of your art depend on it.
- Measuring Cups and Stir Sticks: You’ll need these to measure and mix the resin and hardener in the correct ratio. Accurate measurements are key to a successful pour.
- Pigments and Dyes: Resin comes in clear form, so you’ll need pigments, dyes, or inks to add color. There are different types, such as mica powders, alcohol inks, or liquid pigments. Each one produces different results.
- Molds or Surfaces: Depending on your project, you may need a mold (for casting objects like jewelry or trays) or a flat surface (for creating paintings or tabletops).
- Gloves and Protective Gear: Resin can be messy, and it’s important to protect your skin. Always wear gloves and use protective eyewear if needed.
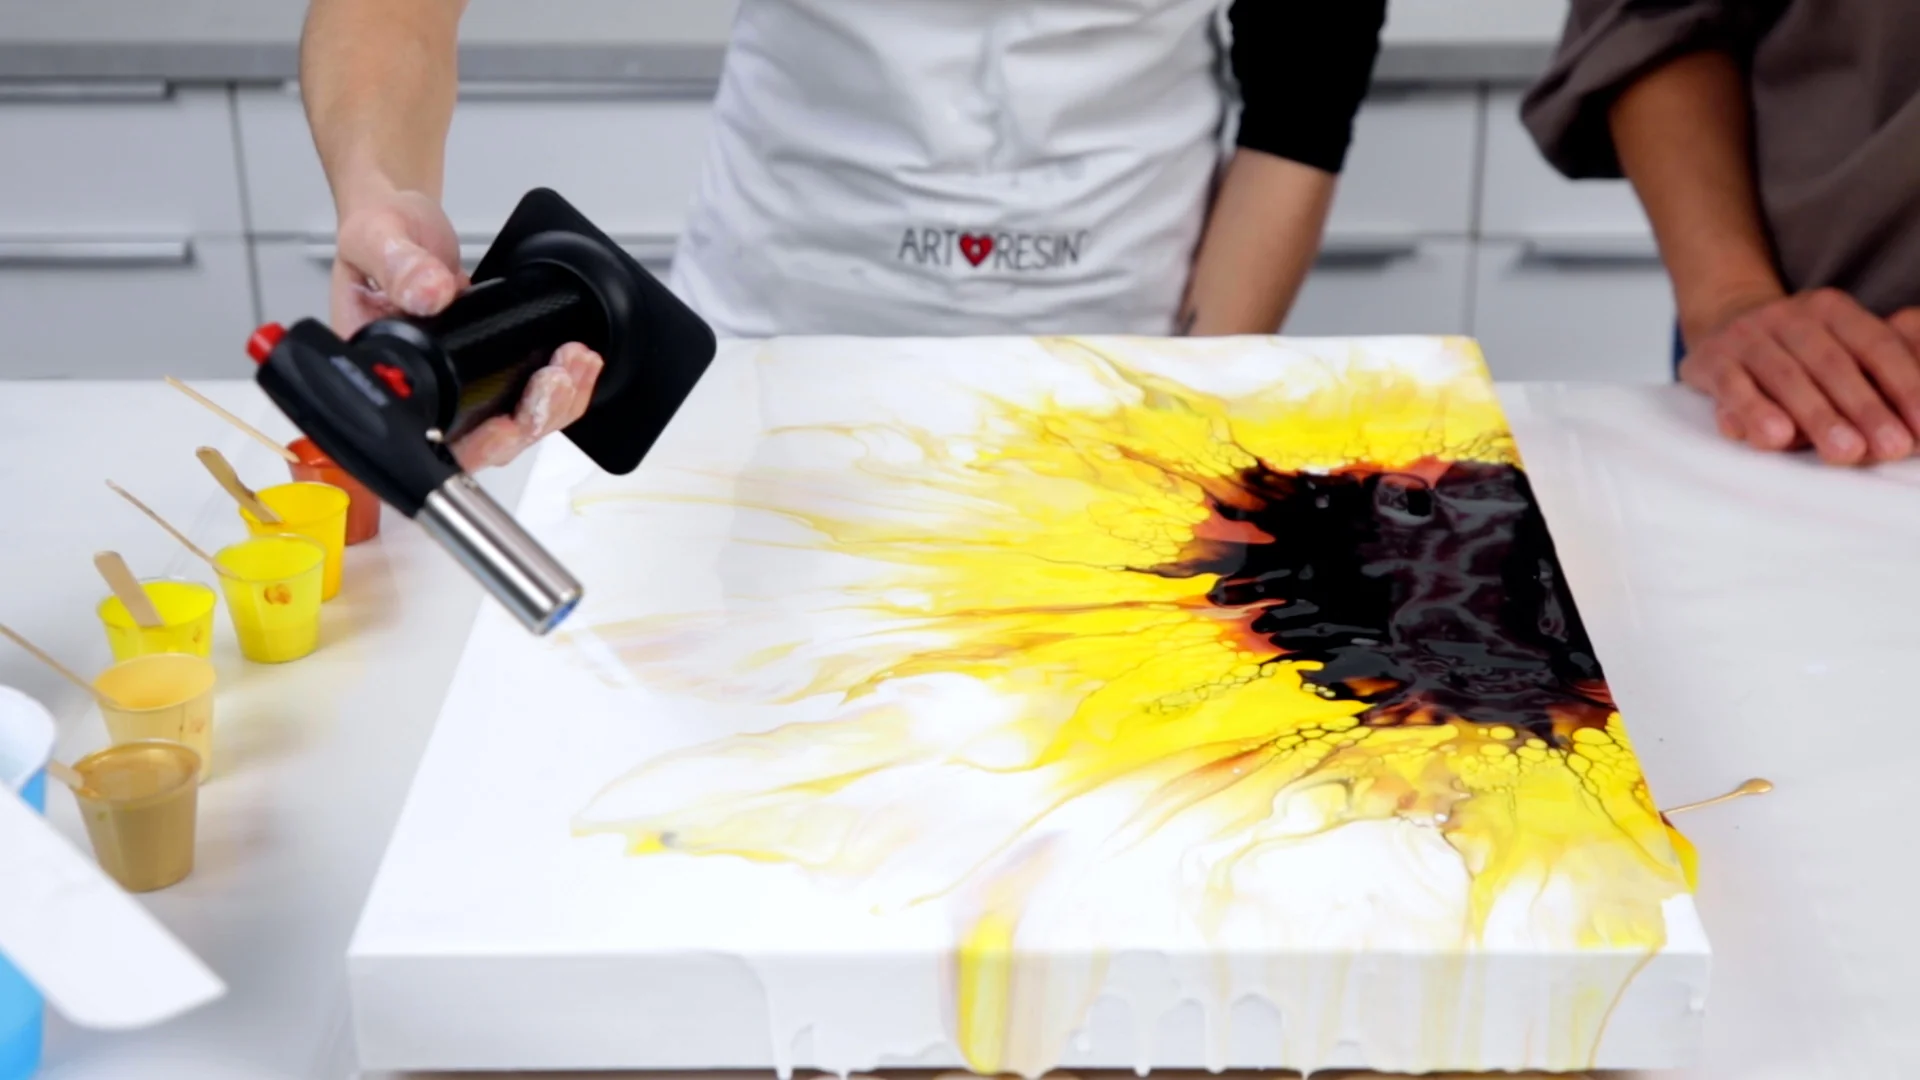
- Heat Gun or Torch: These are used to pop air bubbles that may form in the resin as it hardens.
2. Prepare Your Workspace
Resin can be a bit messy, so it’s important to work in a clean, well-ventilated area. Lay down a plastic or silicone sheet to protect your work surface. Be sure to cover any surfaces that you don’t want resin to touch. Resin is sticky and can be difficult to remove once it hardens, so prevention is key.
Make sure your workspace is dust-free. Even small particles of dust or hair can ruin the glossy finish of your resin project. Some artists use a small fan or even a hairdryer set on cool to help keep the air clear.
3. Mix Your Resin and Hardener
Resin art requires precision when mixing the resin and hardener. Typically, the ratio is 1:1, but always follow the instructions provided by the resin manufacturer. Use separate measuring cups for each component, and mix thoroughly for a few minutes to ensure there are no streaks. Mixing too briefly can result in incomplete curing, while over-mixing can introduce air bubbles.
After mixing, let the resin sit for a minute or two to allow any bubbles to rise to the surface. You can then use a heat gun or torch to pop any remaining bubbles.
4. Add Color and Effects
This is the fun part! You can start adding your pigments and colors to the resin. You can mix colors together, layer them, or create unique patterns. Some artists use alcohol inks for a fluid, watercolor-like effect, while others prefer mica powder for a pearlescent, metallic finish. You can also add glitter or embellishments like dried flowers, shells, or beads to give your artwork a more personalized touch.
Be sure to experiment and see what works best for the look you’re aiming for. Don’t be afraid to play with the materials, as resin art is about discovering new techniques and letting your creativity flow.
5. Pour the Resin
Once you’re happy with your color mix, it’s time to pour the resin onto your project surface. Depending on your piece, you may want to pour in layers, building up different colors or textures. If you’re using a mold, carefully pour the resin into it, making sure to spread it evenly.
While pouring, you may want to use a heat gun or torch to remove any air bubbles that appear on the surface. Just be careful not to overheat the resin or make it too thin.
6. Allow the Resin to Cure
After you’ve poured the resin, it’s time to let it cure. The curing process can take anywhere from 12 to 72 hours, depending on the resin and the thickness of your project. It’s important to allow the resin to cure in a dust-free environment. Don’t rush this step—it’s what ensures your resin art will have that stunning glossy finish.
7. Finish and Polish
Once the resin is completely cured, carefully remove it from the mold or peel away any excess resin from the edges. If your piece has sharp edges, you can sand them down using a fine-grit sandpaper. Polishing can give your resin art a brilliant, glass-like finish.
If you’re making jewelry, keychains, or coasters, you might want to add a metal finding or finishing touch to complete your project. But for wall art or tabletops, your piece should be ready to display!
Conclusion: The Never-Ending Appeal of Resin Art
Resin art is addictive for many reasons: the creative freedom it offers, the instant gratification of watching your ideas come to life, and the soothing, meditative process it provides. It’s a form of art that encourages exploration and experimentation, allowing artists to push the boundaries of their creativity. Whether you’re a beginner or an experienced artist, resin offers endless opportunities to learn, grow, and, most importantly, enjoy the process.
By gathering the right tools, experimenting with colors and techniques, and embracing the unpredictable nature of resin, you can start creating your own stunning works of art. Soon, you may find yourself so hooked that the world of resin art becomes a lifelong passion.
